How to Repair Stucco Cracks to Protect Your Home Walls
Noticed thin, spidery lines creeping across your home's exterior? You're not alone. Stucco repair becomes necessary when these cracks appear due to natural settling, temperature swings, or moisture intrusion. But even a small split can let in moisture, weaken the wall, and lead to repairs that get pricey later.
The good news? Minor stucco crack repair is DIY-friendly when you have the right approach. This piece walks you through everything you need to repair stucco, from understanding what causes cracks to selecting the best stucco repair materials and becoming skilled at the step-by-step process. You'll also learn when exterior stucco repair requires professional stucco repair contractors and how to prevent future damage.
Table of Contents
Understanding Stucco Cracks and What Causes Them
Essential Stucco Repair Materials and Tools You'll Need
Step-by-Step Guide to Repair Stucco Cracks
Preventing Future Cracks and Long-Term Maintenance
Conclusion
Understanding Stucco Cracks and What Causes Them
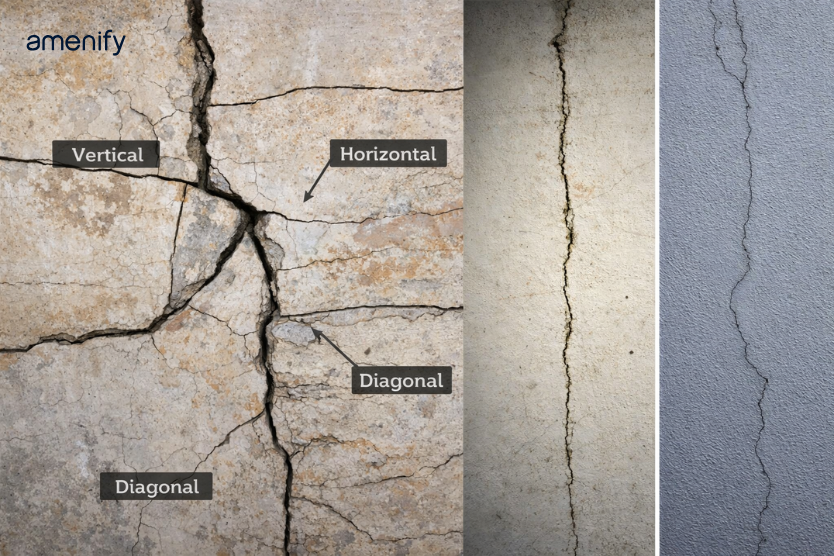
Hairline Cracks vs. Structural Cracks
Hairline cracks measure less than 1/16 inch wide and appear as fine lines on the stucco surface. These thin fractures penetrate deep into the wall in rare cases and develop during the curing process or from minor house settling. Temperature fluctuations cause stucco to expand and contract. This creates superficial splits that don't compromise your home's integrity.
Structural cracks exceed 1/8 inch in width and often extend through multiple stucco layers into the wall or foundation beneath. These wider fractures may appear horizontal, vertical, or diagonal and display signs of ongoing movement. Stair-step patterns along masonry joints signal foundation settlement rather than normal thermal stress. Cracks wider than 3 mm that spread faster or come with bulging surfaces point to serious framing or foundation issues.
Common Causes of Stucco Damage
Foundation settling ranks among the biggest triggers for stucco cracks, especially in new construction, where timber framing dries or ground shifts beneath the structure. Water intrusion causes extensive damage through improper installation, worn caulking, or damaged seals around windows and doors that allow moisture to penetrate. This trapped water reaches the lath and wooden framing. It triggers rot, mold, and surface deterioration.
Installation errors speed up cracking if stucco is applied too thick or thin, mixed incorrectly, or denied proper curing time. Missing water-resistant barriers behind stucco create pathways for moisture to compromise the building's frame. Poor drainage systems at the wall bottoms allow water to penetrate instead of directing it away. Physical impacts from lawn equipment or fallen branches create immediate surface damage, and continuous exposure to sun, wind, and rain degrades the finish over time.
Signs of Moisture Problems
Dark staining, white salt deposits (efflorescence), and small blisters signal moisture intrusion before structural deterioration becomes visible. Stucco that remains damp more than a week after rainfall shows water absorption rather than normal surface wetting. Soft spots that feel spongy or cause material to peel away confirm water damage that needs immediate professional assessment.
Dense cracks or bubbles along the bottom wall edges result from failed drainage systems. Green, black, or gray mold patches reveal ongoing moisture issues in the porous material.
When Small Cracks Need Immediate Attention
Cracks exceeding 1/16 inch need prompt sealing to prevent water entry and progressive damage. Monitor fractures near doors, windows, or corners, as these stress points show concerns about the structure. Growing cracks that lengthen or widen over time suggest active foundation movement that demands professional diagnosis. Cracks that come with sticking doors, misaligned windows, or visible wall bulging need emergency protection while you arrange expert inspection.
Essential Stucco Repair Materials and Tools You'll Need
Before we move ahead, here are a couple of things you’ll need to fix your stucco crack.
Choosing the Right Crack Filler or Caulk
The appropriate filler depends on crack width and what the repair requires. Acrylic-based caulk works best for hairline cracks because the correct tools and methods help it blend into the finish coat with ease. Sanded acrylic formulas contain fine sand that helps match the rough texture of stucco, to name just one example. These products fill and seal cracks up to 1/2 inch wide.
Polyurethane-based caulk provides superior sealing for deeper applications and bonds well to most materials without adverse effects. But its thicker consistency makes blending difficult, so finish coat repairs should avoid it. Some contractors use polyurethane as a base filler for larger cracks and then apply acrylic caulk on top to match the texture.
Flexible vs. Rigid Repair Products
Stucco expands and contracts with temperature changes, making flexibility significant. Repaired cracks reappear when rigid products are used, as your home settles. Elastomeric fillers designed for stucco move with your home and prevent new fractures from forming around old repairs.
High-quality, paintable caulk accommodates settling and thermal changes. The wrong type or incorrect application can trap moisture and worsen existing damage.
Simple Tools for Surface Preparation
Surface preparation prevents repair failure when done right. You'll need a putty knife to scrape loose stucco, a wire brush to clean debris, a caulk gun for application, and a damp sponge to smooth it. Gather fine-grit sandpaper, exterior primer, mixing buckets, and protective gloves as well.
Texture Matching Materials
Matching existing texture makes the difference between a smooth patch and a visible repair. Your walls feature either acrylic or cement-based finishes, and each requires compatible materials for best results. Sand finishes come in fine, medium, or coarse grades depending on aggregate size. Analyze your existing texture's aggregate size and moisture content during original application to achieve proper matching.
Step-by-Step Guide to Repair Stucco Cracks
Here’s a step-by-step guide on how to fix your stucco cracks at home.
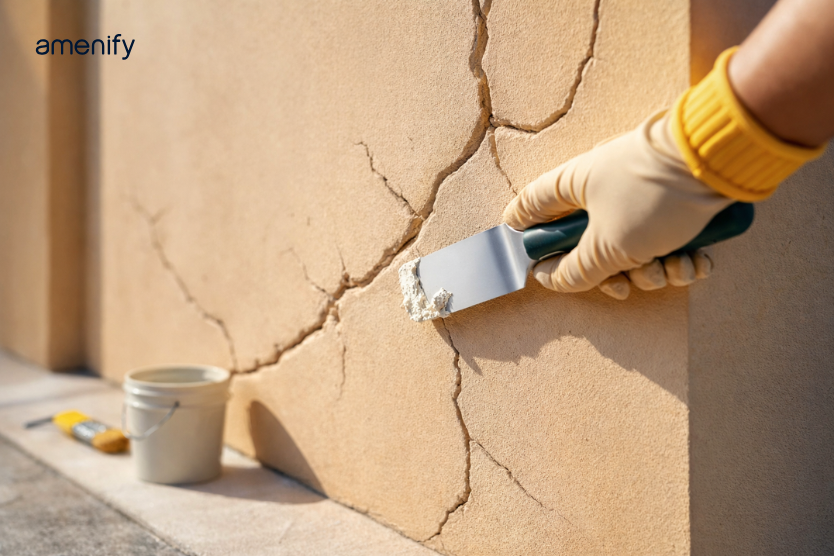
Step 1: Clean and Prepare the Damaged Area
Widen cracks to a minimum of 1/4 inch using a chisel and hammer. Cut edges perpendicular to the wall. Break away deteriorating concrete and remove loose material with a wire brush. Scrape away all loose stucco, paint, or debris until you reach solid, stable surfaces. Use a shop vacuum or stiff brush to clear remaining dust and particles. Wipe the area with a damp sponge and ensure adhesion.
Step 2: Apply the Filler Correctly
Load elastomeric caulk into a caulking gun for hairline cracks. Draw it slowly down the crack and force material deep inside. Wider cracks exceeding 1/4 inch need a pre-mixed stucco patch applied in multiple thin layers. Each layer must dry before you add the next. Press the material into the crack using a putty knife or trowel. This eliminates air pockets. Run a flat board over the area and ensure the patch sits flush with existing surfaces.
Step 3: Match the Texture for a Smooth Finish
Replicate the surrounding texture while the patch remains wet and workable. Use a damp sponge, stiff-bristled brush, or wadded rag. Dab the surface gently and blend the repair with adjacent areas. Step back and check your work from multiple angles.
Step 4: Allow Curing Time
Most repairs require 24 hours for drying. Patches may feel touch-dry in 20-40 minutes. Wait 7 to 14 days before painting. Weather conditions and repair size determine the exact time. Mist the area with water during curing and prevent cracking.
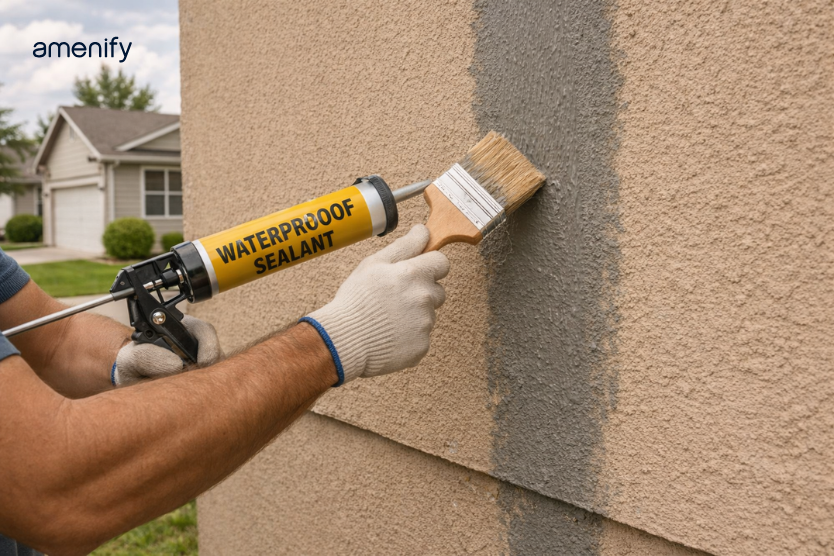
Step 5: Prime and Paint the Repaired Surface
Apply quality masonry or stucco primer and seal the surface. This prevents moisture absorption. Paint with high-quality exterior paint designed for stucco surfaces once the primer dries. Some rapid-set products accept paint after just 90 minutes.
Preventing Future Cracks and Long-Term Maintenance
Regular Inspection Schedule
You should inspect your stucco at least once yearly during spring or early summer. Harsh winters or heavy storms demand additional checks since freezing temperatures and water penetration often cause new damage. Professional inspections every 3-5 years find hidden moisture using thermal imaging and moisture meters that DIY checks miss. Early issue detection saves homeowners an average of 30% on repair costs. A $500 patch job becomes a $15,000 wall replacement when you neglect it.
Protective Coating Application
Silane-siloxane sealers create a water-repellent barrier that protects for up to 5 years. These breathable coatings stop wind-driven rain and allow trapped vapor to escape. Paint your stucco every 5-7 years to protect the underlying flashings and moisture barriers.
Water Flow Management Around Your Home
Clean gutters twice yearly to prevent overflow saturation. Extend downspouts 4-6 feet from your foundation. Verify ground slopes away from walls at a 1-inch drop per horizontal foot.
When to Call Stucco Repair Contractors
Contact professionals when cracks exceed 1/8 inch wide, moisture stains appear, or large wall sections show damage. Extensive cracking, bubbling surfaces, or interior water stains require expert assessment.
Conclusion
You now have everything needed to repair stucco cracks and protect your home from expensive damage. Small cracks are manageable with the right materials and techniques. Note that early intervention saves homeowners an average of 30% on repair costs. Inspect your walls regularly and apply protective coatings. Manage water flow effectively. Structural cracks or extensive damage require professional expertise, though. Amenify connects you with trusted stucco repair contractors when DIY solutions aren't enough. Stay proactive with maintenance. Your stucco will remain beautiful and protective for years to come.
How Can Amenify Help?
When stucco damage goes beyond simple DIY fixes, Amenify connects you with trusted professionals across India for reliable inspection and repair services. Whether you're dealing with deeper cracks, moisture damage, or full exterior restoration, Amenify helps you find skilled experts to get the job done efficiently, so your home stays protected and looks its best.
FAQs
-
Yes, but it's important to use the right type. Choose a high-quality, paintable exterior caulk with elastomeric (flexible) properties that can stretch with temperature changes and house settling. Avoid basic products that may become brittle quickly. Flexible caulk prevents cracks from reopening as your home naturally expands and contracts.
-
Your homeowners policy may cover stucco damage if it resulted from a covered peril like storm damage or sudden accidents, but not from normal wear and tear or lack of maintenance. Most stucco damage stems from water intrusion, staining, or mold, so review your specific policy to understand what's covered.
-
Yes, even hairline cracks should be addressed. While they may seem minor, these small fractures can allow moisture to penetrate your walls, potentially leading to more serious damage over time. For very fine cracks, you can often seal them with elastomeric paint, but cracks wider than 1/16 inch should be filled with appropriate caulk or filler.
-
For cracks wider than 1/4 inch, stucco patch material generally works better than caulk alone. However, flexible caulk is often the better choice for most repairs because it moves with your home and is less likely to crack again. A stucco patch can be harder to blend seamlessly unless you have experience matching textures.
-
The key is texture matching. While the repair material is still wet, use a damp sponge to dab the surface and replicate the surrounding texture. Step back frequently to check your work from different angles. Once cured, prime and paint the area with exterior paint designed for stucco to complete the seamless finish.
-
Amenify provides many in-home services. Sign up to get $50 off on your first home service or product.